The first time I watched a swing door being installed on a villa project, I thought everything was going smoothly. The frame was square, the hinges looked solid, and the team was confident.
Then the trouble showed up. One hinge was marked just slightly off, and suddenly the door scraped the floor every time it opened. Hours of work had to be redone, and the schedule slipped.
That was when I realized swing door installation isn’t just about hardware and tools. It’s about step-by-step accuracy from unpacking the door to the final adjustment.
Whether you’re fitting doors in a hotel, a guesthouse, or even a greenhouse, this guide will take you through the entire process so you don’t repeat those costly mistakes. You’ll see exactly how to go from a boxed door set to a finished, smooth-swinging install.
By the end, you’ll have a clear process you can repeat with confidence on any project.
So let’s get started!
Quick Comparison Chart
Before we break down each step in detail, here’s a quick side-by-side overview of the whole process. It’s your roadmap for a smooth installation.
| Step # | Step Title | Key Action | Best Practice |
| 1 | Unpack and Inspect the Door Set | Lay door flat, check for damage, confirm fit | Group all hardware before starting |
| 2 | Mark the Hinge Positions on the Door Frame | Measure and mark top, bottom, and middle hinge spots | Use a carpenter’s square for accuracy |
| 3 | Chisel or Rout the Hinge Mortises | Cut shallow pockets for hinge leaves | Test hinge fit often while cutting |
| 4 | Pre-Drill Screw Holes for Hinges | Drill pilot holes for screws | Use a bit slightly smaller than the screw shaft |
| 5 | Attach Hinges to the Door | Secure hinges to door in mortises | Start with one screw to hold hinge before adding the rest |
| 6 | Position and Support the Door in the Frame | Lift and hold door in place | Use shims to adjust height and gaps |
| 7 | Secure Hinges to the Door Frame | Fasten hinges to frame starting at the top | Swing door gently before fully tightening screws |
| 8 | Install the Strike Plate | Mark latch point, cut recess, screw plate in | Test latch fit before final tightening |
| 9 | Fit the Handle and Latch Set | Drill holes, fit latch and handles | Follow manufacturer’s template |
| 10 | Final Checks and Adjustments | Test swing, tighten screws, add weatherstrips | Make small hinge adjustments as needed |
Now that you’ve got the overview, we’ll go step-by-step and make sure every detail is covered.
Step#1 Unpack and Inspect the Door Set
Start by unpacking the swing door and placing it on a clean, stable surface. Laying it flat gives you a clear view of the condition and makes it easier to check that all parts are present. Skipping this step might feel like saving time, but it often creates problems later when damage or missing pieces show up mid-install.
Check for Visible Damage
- Cracks or Splits: Scan the edges and corners carefully. Even a small crack can spread and weaken the door.
- Warping: Place the door flat and see if it rocks or bows. A warped panel won’t swing smoothly once mounted.
- Surface Dents or Scratches: Minor marks may not matter, but deeper ones can affect strength and appearance.
Measure Before You Move Forward
- Door Size: Use a tape measure to record the door’s height and width. Keeping numbers on paper avoids mistakes later.
- Frame Opening: Compare those numbers with the rough opening. Even a few millimeters off can cause fitting issues.
Check Hardware and Accessories
- Hinges and Screws: Lay them out and count carefully. Having the right number now saves hunting later.
- Handles and Locks: Match them to your design and function needs. It’s better to notice a mismatch before you start drilling.
- Fasteners and Templates: Some kits include templates that speed up marking. Keep them aside you’ll be glad you did.
On one project, a missing hinge screw held up the entire installation. Since then, I always spread everything out and confirm before touching the drill. That simple habit keeps the job moving without surprises.

Step#2 Mark the Hinge Positions on the Door Frame
After unpacking and inspecting the door, the next step is marking the hinge locations. Accuracy matters here. Even a small mistake can throw off the swing and cause problems once the door is mounted.
It’s easy to overlook how critical this stage is. On big projects, a hinge marked just a fraction out of place has caused hours of rework and frustration. That’s why it’s worth slowing down and getting it right the first time.
Follow Standard Hinge Placement
Hinge placement follows a simple formula, and sticking to it keeps the door balanced.
- Top Hinge: Measure 7 inches down from the top of the door. This hinge carries most of the weight and sets the tone for a steady swing.
- Bottom Hinge: Measure 11 inches from the bottom edge. Together with the top hinge, it helps guide the swing smoothly.
- Middle Hinge: Add one halfway between the top and bottom if the door is tall or heavy. This extra support keeps the door aligned and prevents sagging over time.
Skipping the middle hinge on a heavy door is a mistake that shows up quickly. 6 weeks later, the door may start dragging on the floor, and by then, the only option is to redo the work.
Use the Right Tools to Mark Clearly
Good results don’t need fancy equipment. A pencil and a carpenter’s square are more than enough to get precise, straight markings.
- Light Pencil Marks: Easy to erase or adjust if needed, so you can make corrections without damaging the door.
- Use a Carpenter’s Square: Keeps your lines straight and perfectly aligned with the door edge.
- Trace the Hinge Shape: Hold the hinge in place and outline its top, bottom, and screw holes for accuracy.
- Check Both Door and Frame: Matching hinge positions ensures everything comes together cleanly during installation.
This step might feel small, but it sets the tone for the rest of the job. Vallisco has seen time and again how precise hinge marking separates a smooth, professional swing from a frustrating rework.

Step#3 Chisel or Rout the Hinge Mortises
After marking your hinge positions, the next step is carving shallow pockets in the door edge and frame. These pockets are called hinge mortises. Their purpose is simple: they let the hinge leaf sit flush with the wood so the door can close cleanly. Without them, the hinge sticks out and the door feels stiff or uneven.
This step takes patience, but the payoff is worth it. Clean mortises not only improve function, they also make the installation look neat and professional.
Score the Outline First
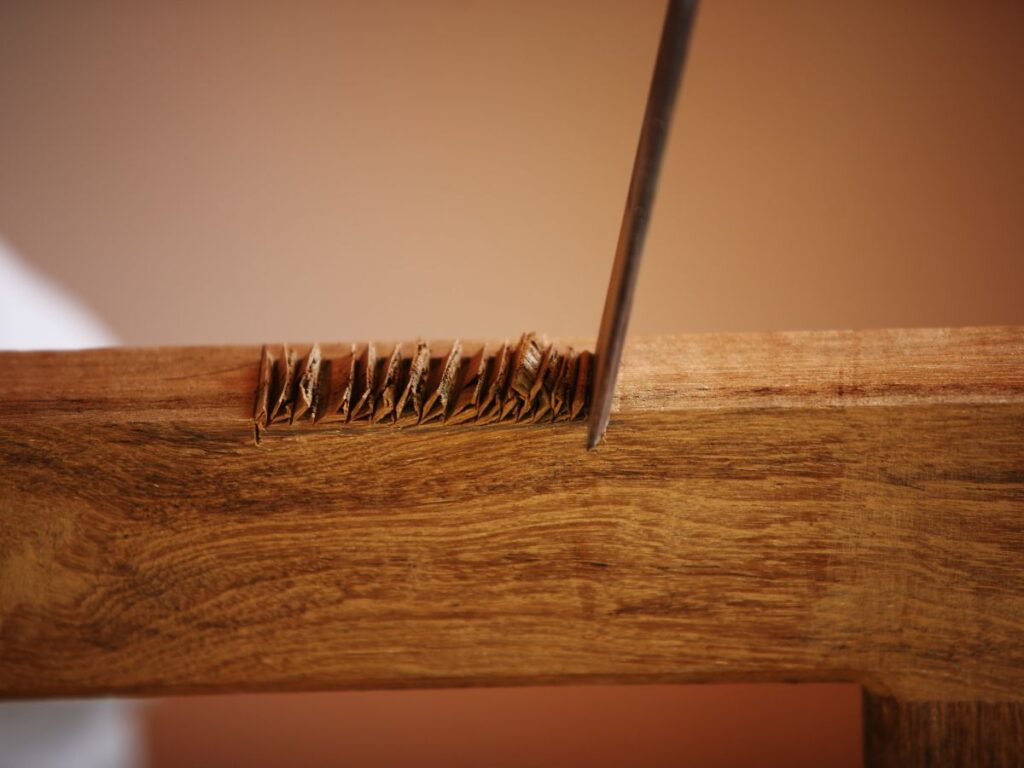
Before removing any wood, score the hinge shape. A clear outline helps guide your cuts and reduces splintering.
- Use a Utility Knife: Hold the blade firmly and trace the pencil lines you made earlier. This keeps the edges sharp and prevents the wood fibers from tearing.
- Go Around the Entire Shape: Trace all four sides of the hinge outline. A second light pass helps deepen the cut without damaging the surface.
Skipping this step often leads to rough or uneven mortises. It’s a shortcut that usually costs more time in the end.
Chisel or Rout to the Right Depth
Once your outline is ready, start creating the pocket. The depth should match the hinge thickness so it sits level with the surface.
- Use a Sharp Chisel: Tap gently along the edges, then angle the blade to shave off thin layers until the pocket looks even.
- Try a Trim Router: For multiple doors or larger projects, a router makes the work faster. Set the bit to the hinge thickness and move slowly along the outline.
- Test the Fit Often: Place the hinge into the pocket as you go. The hinge should rest flat, not wobble or stick out.
- Avoid Over-Cutting: Removing too much wood weakens the edge. Stop as soon as the hinge lies flush with the surface.
A clean, flush mortise makes a big difference. The door swings smoothly, and the finished look tells anyone who walks through that the job was done with care.

Step#4 Pre-Drill Screw Holes for Hinges
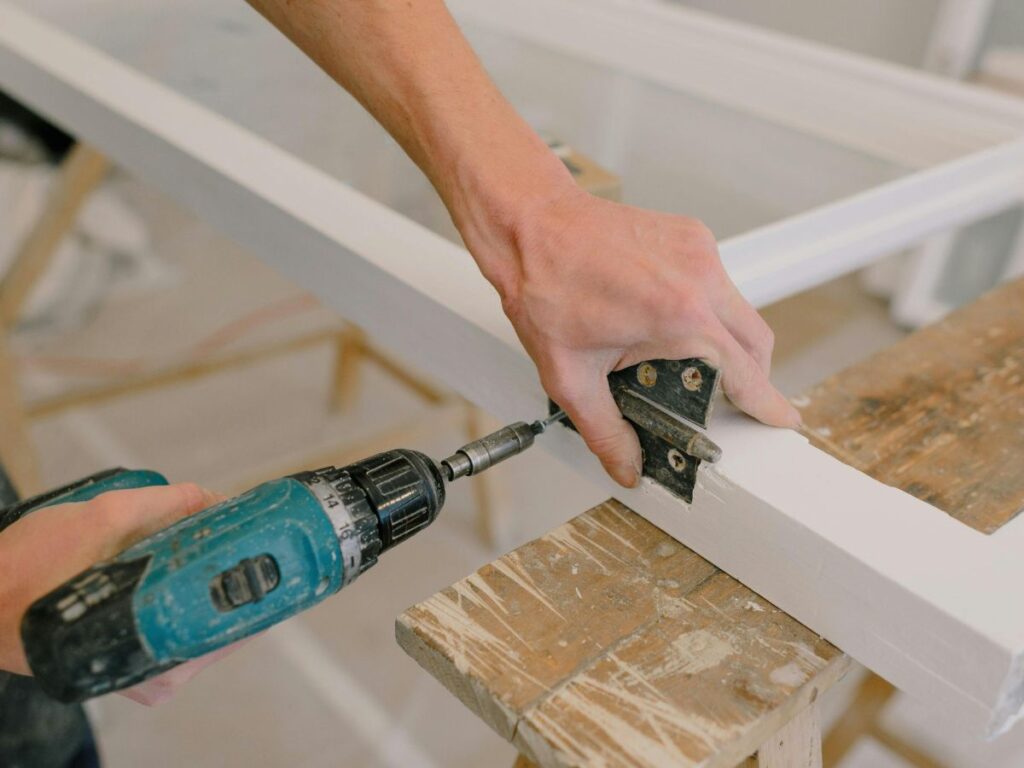
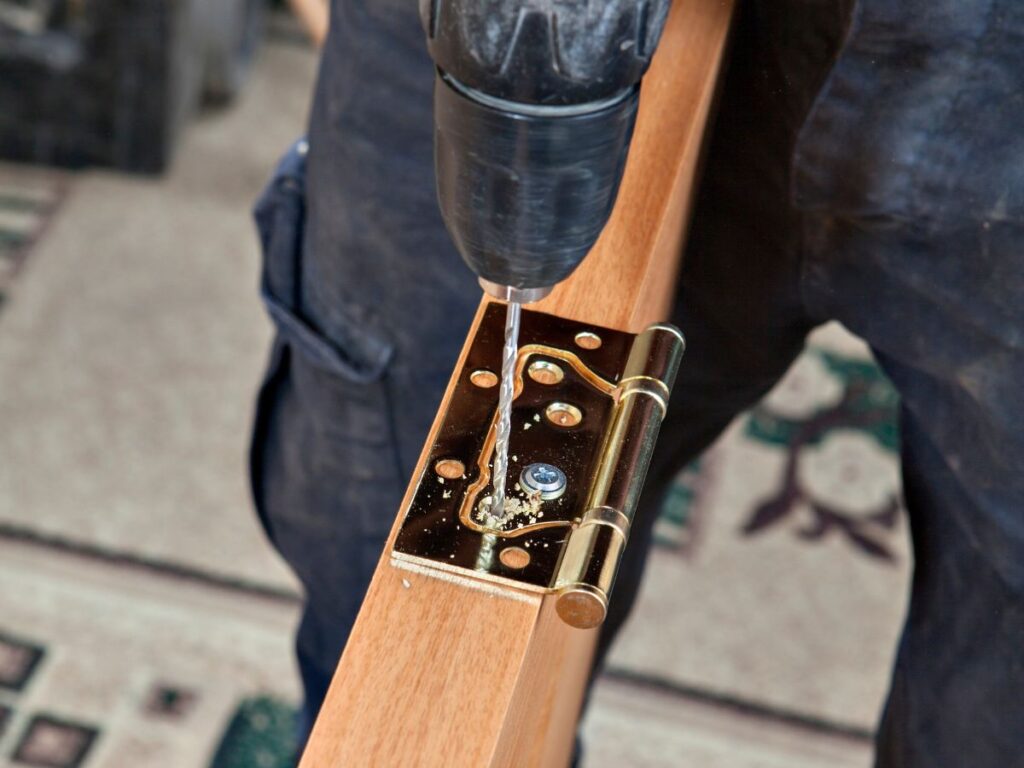
Once the hinge mortises are finished and the hinges fit neatly, the next task is pre-drilling the screw holes. This small step makes the installation smoother and keeps everything aligned. Before drilling, it’s always worth checking the hinge placement one last time to confirm nothing shifted.
Position the Hinge in the Mortise
Place the hinge back into the recess you cut earlier. The hinge edges should sit square against your outline.
- Align the Hinge Leaf: Press the hinge flat into the mortise so it rests evenly with no rocking or gaps. This creates a snug fit that supports the door properly.
- Hold the Hinge in Place: Steady it with one hand, or use a temporary screw to keep it from sliding while you work.
Mark the Screw Hole Centers
Marking the centers helps guide your drill bit and prevents slipping. A simple pencil mark or indentation makes the next step easier.
- Use a Center Punch or Awl: A small dent keeps the bit from wandering when you begin drilling. This saves time and avoids crooked holes.
- Double-Check Hole Positions: Confirm that each mark is centered inside the hinge holes. Even small errors can affect alignment.
Drill Pilot Holes for Screws
Pilot holes are shallow starter holes that make it easier to drive screws straight and clean.
- Select the Right Bit: Choose a drill bit slightly smaller than the screw shaft so the threads grip tightly.
- Drill Straight and Steady: Hold the drill at a 90-degree angle and work at medium speed for accuracy.
- Set the Depth: Wrap tape around the drill bit to match screw length. This keeps the hole from going too deep.
With the pilot holes drilled, the hinges are ready to be mounted. It’s a simple habit that saves time later and helps the whole installation stay on track.

Step#5 Attach Hinges to the Door
After your pilot holes are drilled, it’s time to attach the hinges. This step locks the hardware into place and gets the door ready to hang. I always take a second here to check the hinge alignment before driving in the screws.
The process is simple, but I’ve seen people rush and misalign the first screw. That throws off the whole hinge. So slow it down just a little, and the result will be much cleaner.
Place the Hinge in the Mortise
Start by setting the hinge back into the mortise you’ve already cut.
- Check the Fit Again: The hinge leaf should sit flush with the surface, with no gaps or rocking.
- Align With the Edge: The outer hinge edge should line up with the edge of the door. Make sure it’s square before moving on.
Drive the Screws Into the Pilot Holes
With the hinge positioned, you’re ready to attach it using the screws that came with your hardware.
- Start With One Screw: Begin with the center hole to hold the hinge in place. This helps prevent shifting while installing others.
- Add Remaining Screws: Once the hinge is steady, insert and tighten the rest. Make sure all screws are snug, but don’t overtighten you might strip the hole.
Check the Hinge Movement
Before installing the door, test the hinge by moving it back and forth.
- Open and Close the Leaf: The hinge should move smoothly without catching. If it feels tight or loose, double-check the screw depth or hinge alignment.
- Adjust If Needed: It’s easier to make small adjustments now before the door is hung.
This step gives your door the strength it needs at the pivot point. When done right, it feels solid and moves just the way it should.
Step#6 Position and Support the Door in the Frame
Now that your hinges are attached to the door, it’s time to place the door into the frame. This part takes a little coordination. The door must be positioned at the right height and spaced evenly on all sides.
I’ve learned that this step is easier with an extra set of hands. But if you’re working alone, shims can be a lifesaver. They help you hold the door steady and adjust the position without rushing.
Lift the Door Into the Frame
Carefully move the door toward the opening. Hold it upright and close to its final position.
- Keep It Steady: The hinge side should face the frame, ready to align with the mortises. Use both hands or get help to avoid bumps or scratches.
- Rest the Door on Shims: Place thin, angled pieces of wood called shims under the door. These raise it to the correct height and keep it stable while you work.
Check the Spacing Around the Door
Before securing anything, take a moment to check the spacing between the door and the frame.
- Look at the Top Gap: There should be a small, even space between the top of the door and the frame. This allows the door to swing freely.
- Check the Side Gaps: Gaps on both sides of the door should also be even. Uneven spacing can cause rubbing or sticking when the door is used.
- Adjust Using Shims: If the gaps are off, add or remove shims under the door or along the hinge side until things look right.
Getting this part right makes the next step go much smoother. A well-supported door sits exactly where it should and that makes hanging it feel a lot less stressful.
Step#7 Secure Hinges to the Door Frame
With the door supported in the frame, it’s time to attach the hinge leaves to the frame side. This step locks everything together and gives the door its first real movement.
Start carefully with the first screws. Rushing here can throw the alignment off, and fixing that later takes more effort than getting it right from the start.
Anchor the Top Hinge First
The top hinge carries most of the weight, so it’s the first one to secure. Once it’s anchored, the rest of the door will fall into place more naturally.
- Drive in One Screw: Place a screw through the hinge and into the pre-drilled hole. This holds the door steady while you work on the lower hinge.
- Let the Door Hang Naturally: Step back and check the gaps once the screw is in. The door should sit comfortably in the frame without leaning.
Test the Swing Before Tightening All Screws
Checking the swing now prevents larger adjustments later. A smooth motion means the placement is correct.
- Swing the Door Gently: Open and close it slowly to feel how it moves. Look for rubbing on the sides, top, or bottom.
- Adjust If Needed: Shift the door slightly if the gaps are uneven. Small corrections now save time down the line.
Finish Securing the Hinges
Once the door moves smoothly, finish driving the rest of the screws.
- Tighten the Rest: Secure each hinge fully, applying firm but controlled pressure. Avoid driving screws too deep, which can strip the holes.
- Double-Check the Movement: Test the swing again after all screws are in place. The door should move easily and sit flush when closed.
At this point, the door is officially hanging. It’s the stage where everything starts to look finished, and the work feels like it’s coming together.

Step#8 Install the Strike Plate
Now that your door is hanging and swinging freely, you need a way to keep it closed. That’s where the strike plate comes in. The strike plate is the metal piece on the door frame that the latch clicks into when the door shuts.
Getting this piece in the right position is what makes a door feel complete. I’ve had projects where everything looked great, but the latch wouldn’t catch. That’s why I always take time to test and mark carefully before I drill anything in.
Mark the Latch Contact Point
Start by finding the exact spot where the latch meets the frame. This gives you the center point for the strike plate.
- Close the Door Softly: Push the door toward the frame until the latch touches the edge. Don’t slam or force it shut.
- Mark Top and Bottom Edges: Use a pencil to draw lines where the top and bottom of the latch hit the frame. These marks help center the plate correctly.
Cut the Recess for the Strike Plate
Just like you did with the hinge mortises, you’ll need to create a shallow pocket for the strike plate so it sits flush.
- Trace the Plate Outline: Hold the strike plate between your pencil marks and trace around it with a utility knife. This gives you clean edges to work inside.
- Use a Chisel or Router: Remove thin layers of wood until the strike plate sits level with the frame surface. Check the depth often so you don’t cut too deep.
Attach the Strike Plate With Screws
Now that the recess is ready, it’s time to secure the strike plate.
- Drill Small Pilot Holes: Use a drill bit slightly smaller than your screws. This keeps the wood from splitting when you install it.
- Drive the Screws In: Line up the plate, then tighten both screws until the plate feels firm and doesn’t move.
Once installed, close the door fully. The latch should slide into the plate without sticking or bouncing back. If it does, make small adjustments. Vallisco has seen time and again that a properly placed strike plate not only improves function but also gives every door that satisfying, professional close.

Step#9 Fit the Handle and Latch Set
With the strike plate installed, the next step is adding the handle and latch set. This is where the door becomes more than just a frame on hinges it finally feels complete. Once this step is done, you’ll have a secure swing door that looks finished and works as it should.
There’s something satisfying about this stage. After all the careful prep, you finally install the part people see and use every single day.
Drill Holes Using the Template
Most latch and handle sets include a paper or cardboard template. This simple guide shows you exactly where to drill.
- Tape the Template in Place: Secure it at the right height, usually about 36 inches from the floor. That height feels natural and comfortable for most people.
- Drill the Main and Latch Holes: Use the marked spots to guide your drill for both the large handle hole and the smaller latch hole. Go slowly to avoid splintering the wood.
Install the Latch Mechanism
Once the holes are ready, you can slide the latch mechanism into the edge of the door.
- Slide the Latch Into Place: Position it so the angled side faces the closing direction. That angle helps the latch click smoothly into the strike plate.
- Secure With Screws: Fasten the latch faceplate with the provided screws. Keep it flush with the surface for a neat finish.
Attach the Handles
Now it’s time to connect the handles on both sides of the door.
- Line Up the Handles: Insert the spindle the rod connecting the handles through the latch opening. This keeps both sides working together.
- Tighten All Screws: Secure the handles firmly and check that they move the latch without sticking.
When everything is in place, test the door a few times. The handle should feel solid, and the latch should click into the strike plate without hesitation. It’s the last detail that makes the door feel ready for use.
Step#10 Final Checks and Adjustments
With the hardware installed, the door is nearly ready for everyday use. The last step is making sure it works the way it should. This is where small adjustments make a big difference in how the door feels and performs.
Skipping these checks often leads to extra work later. A few minutes now to test and fine-tune can save hours of fixing once the project is supposed to be finished.
Test the Door Movement
Open and close the door several times to see how it operates. Pay attention to both the swing and the latch.
- Check for Smooth Swing: The door should move freely without scraping the frame or floor. If you notice resistance, identify exactly where it happens.
- Confirm Latch Engagement: The latch should slide easily into the strike plate and click into place. It should feel secure without needing extra force.
Tighten or Adjust Hardware
If the movement feels off, small fixes can usually solve the issue.
- Tighten All Screws: Go over the hinges, handle, and latch screws with a screwdriver. Even one loose screw can affect alignment.
- Adjust the Hinges: If the gaps around the door look uneven, loosen the hinge screws slightly, reposition the door, and then retighten.
Add Finishing Touches
A few final details complete the installation and improve long-term performance.
- Install Weatherstripping: For exterior doors, apply it along the frame to block drafts and moisture. It also helps soften the closing sound.
- Clean the Work Area: Wipe down the door, sweep up shavings, and remove any leftover tape or markings.
Once this step is done, the door should not only look polished but also function smoothly. There’s a real sense of satisfaction in stepping back and seeing a swing door finished the right way from start to finish.
Conclusion
We’ve covered the full process: measuring, mortising, hinging, and fine-tuning until your swing door feels solid and smooth. Each step matters, and skipping even one can cost you time and effort.
I’ve seen the difference careful work makes. Now you can too.
What’s stopping you from putting these steps into action today?
Is your next door waiting in storage, ready to be installed?
Reach out to Vallisco today let’s get it done right.
Dive Deeper Into Our Resources
Looking for more product options? Take a look at our carefully chosen selections to find what suits your needs best:
Still haven’t found what you’re looking for? Don’t hesitate to contact us. We’re available around the clock to assist you.


